by
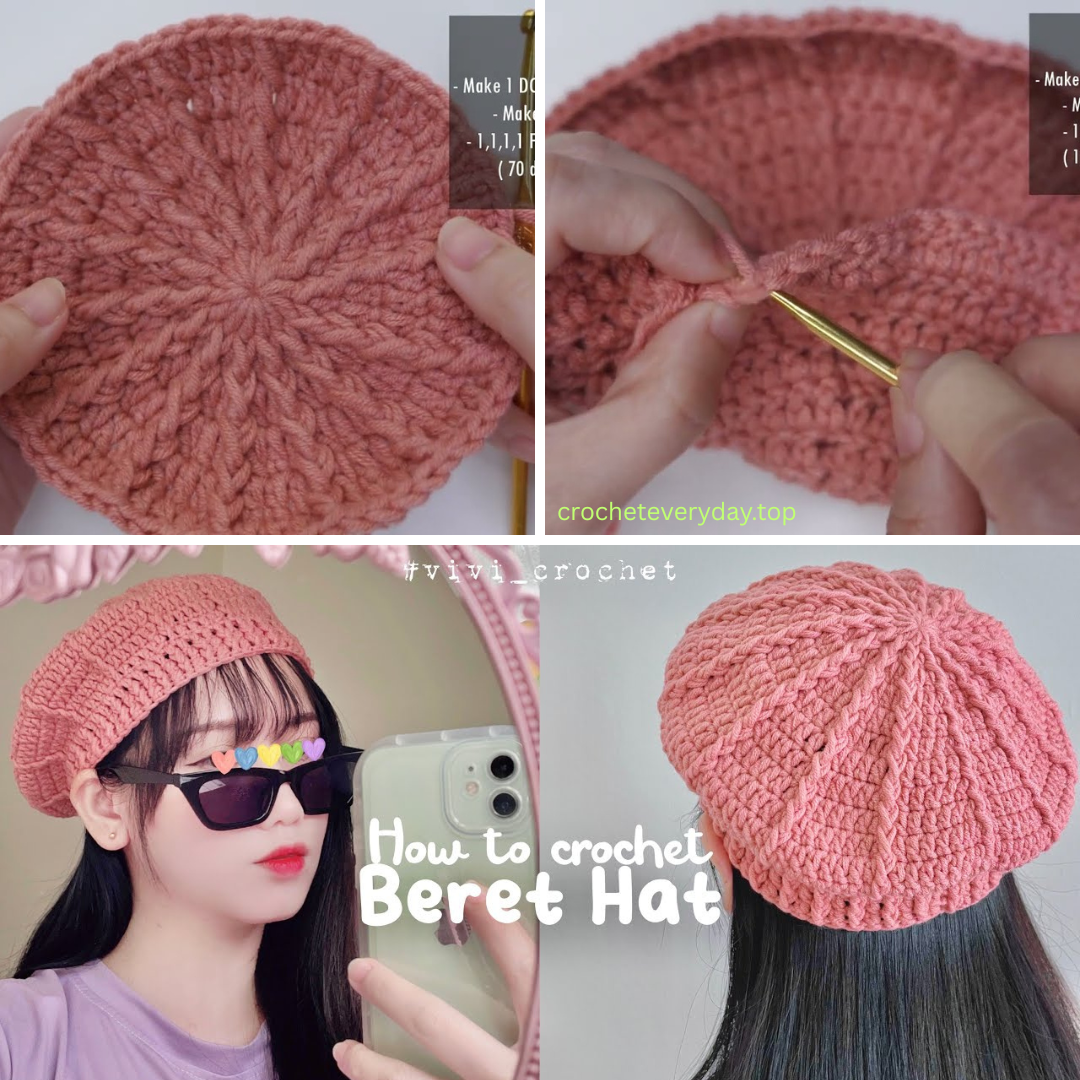
by Crocheting your own beret hat is a fun and fashionable way to express your creativity while crafting a timeless accessory. Whether you want a classic French-style beret or a modern slouchy version, this versatile hat is surprisingly easy to make—even for beginners!
In this comprehensive guide, we’ll walk you through how to crochet a beret hat step-by-step, from choosing the right yarn to shaping and finishing your chic headwear. Let’s stitch some style into your wardrobe!
Why Crochet a Beret?
A crocheted beret offers both form and function. Here’s why it’s such a popular DIY project:
-
Stylish & Timeless: The beret never goes out of fashion.
-
Customizable: Play with colors, textures, and sizes.
-
Great Gift: A handmade beret is personal and practical.
-
Beginner-Friendly: With a few basic stitches, you can create a beautiful finished product.
-
Quick Project: Most berets can be completed in just a few hours.
Materials You’ll Need
Before diving into the pattern, gather these essential supplies:
Essentials:
-
Yarn: Worsted weight (#4) or DK (#3) yarn is perfect. Wool, acrylic, or a wool blend works well.
-
Crochet hook: Typically 4.5 mm – 5.5 mm (check yarn label for recommendation).
-
Tapestry needle: For weaving in ends.
-
Scissors
-
Stitch marker (optional but helpful)
Optional:
-
Pom-pom (for a fun top detail!)
-
Buttons, beads, or appliqués for embellishment
Crochet Stitches You’ll Use
You don’t need to be an expert to make a beret! Most basic patterns include:
-
Magic Ring (adjustable ring) – for a tight, gap-free center
-
Chain (ch)
-
Slip Stitch (sl st)
-
Single Crochet (sc)
-
Double Crochet (dc)
-
Half Double Crochet (hdc) – optional
-
Increases (2 dc in one stitch) – to widen the top
-
Decreases (dc2tog) – to shape the band
Beret Structure Overview
Understanding the shape of a beret will help you visualize your work:
-
Crown – The flat, round top of the beret.
-
Body – The widest part; gives the beret its puff or slouch.
-
Band/Rim – The fitted edge that holds it on your head.
Step-by-Step Pattern: Classic Crochet Beret
This simple pattern will create a medium-sized, adult beret using double crochet stitches.
Step 1: Crochet the Crown
Start with the magic ring (or chain 4 and join to form a ring).
Round 1:
Ch 2 (counts as first dc).
Work 11 dc into the ring.
Sl st to join. (12 dc total)
Round 2:
Ch 2. Work 2 dc in each stitch around.
Join with sl st. (24 dc)
Round 3:
Ch 2. (1 dc in next stitch, 2 dc in next) repeat around.
Join. (36 dc)
Round 4:
Ch 2. (1 dc in next 2 stitches, 2 dc in next) repeat around.
Join. (48 dc)
Continue Increasing:
Follow the same increase pattern (adding 1 more single dc between increases in each round) until the crown reaches about 10–11 inches (25–28 cm) in diameter.
This gives the classic beret its flat, wide shape.
Step 2: Form the Body
Now that you’ve reached your desired width, stop increasing.
Next 4–6 Rounds:
Ch 2. Dc in each stitch around.
Join each round with a sl st.
This creates the signature puffy, slouchy body of the beret. You can adjust the number of rounds based on how much slouch you want.
Step 3: Decrease for the Band
Start tapering down to fit the head snugly.
Next Round:
Ch 2. (Dc in next 2 stitches, dc2tog) repeat around.
Join.
Next Round:
Ch 2. (Dc in next stitch, dc2tog) repeat around.
Join.
Next Round:
Ch 2. Dc2tog around.
Join. (You should now have around 48 stitches or fewer, depending on head size.)
Step 4: Add the Ribbed Band
To create a snug, stylish band:
Last 3–4 Rounds:
Switch to single crochet (sc) or front post/back post double crochet (for a ribbed effect).
Optional: Use a smaller hook size for a tighter band.
Fasten off and weave in ends.
Customization Ideas
Once you’ve mastered the basic shape, try one of these creative spins:
1. Color Block or Stripes
-
Alternate colors every few rounds for a playful or bold look.
❄️ 2. Textured Stitches
-
Use puff, bobble, or shell stitches in the body for added dimension.
3. Appliqués or Embroidery
-
Add a crochet flower, embroidered initials, or decorative buttons.
4. Pom-Pom Topper
-
Sew a large yarn pom-pom to the center for a cozy winter look.
Sizing Tips
-
Standard adult head circumference: 21–23 inches (53–58 cm)
-
For a snug band, aim for 1–2 inches smaller than the actual head size.
-
Try the beret on as you go (or measure against a hat you already own) to ensure a good fit.
Care & Maintenance
-
Hand wash in cold water with mild soap.
-
Gently squeeze out excess water—don’t wring.
-
Reshape while damp and lay flat to dry.
-
For wool yarns, consider blocking the hat for better shape.
VIDEO TUTORIAL :
Final Thoughts
Crocheting a beret hat is a fulfilling project that combines art, fashion, and functionality. It’s ideal for anyone looking to add a personal touch to their wardrobe or gift something handmade and heartfelt. With just a hook, some yarn, and a little time, you can create a beautiful, one-of-a-kind accessory that elevates any outfit.
So grab your favorite yarn, settle into your cozy crafting corner, and start crocheting your very own stylish beret today! ✨