by
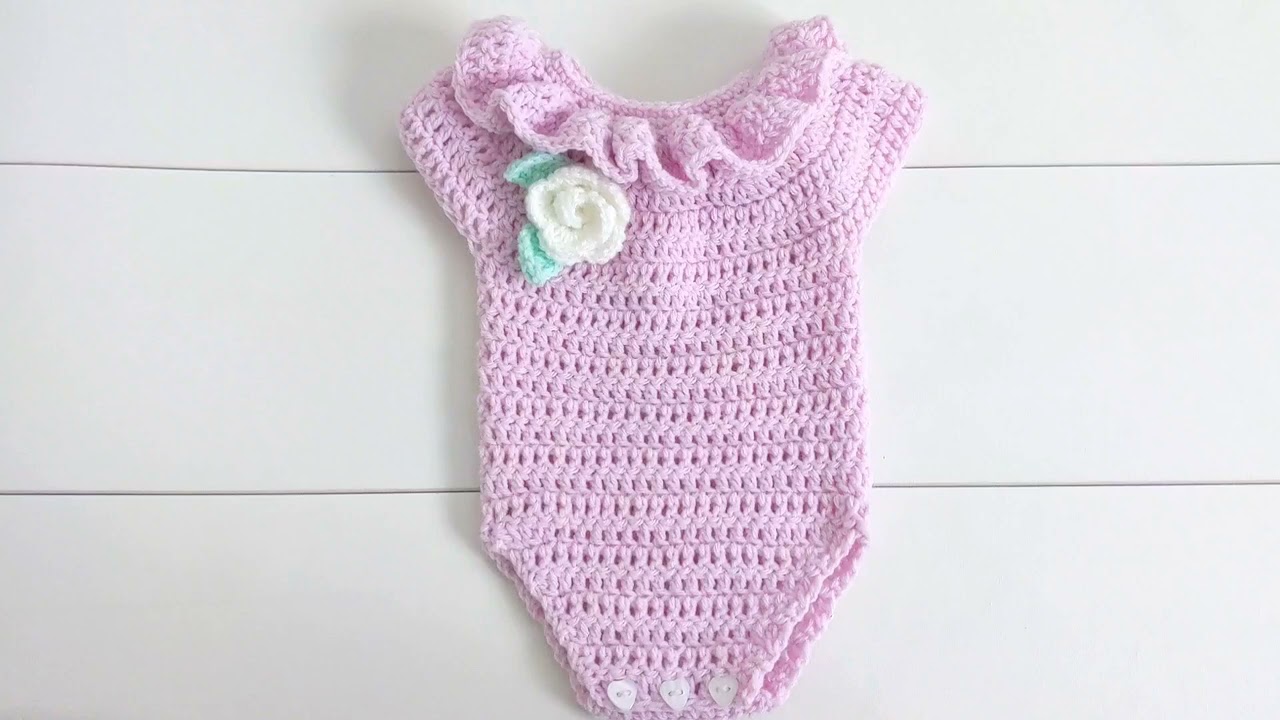
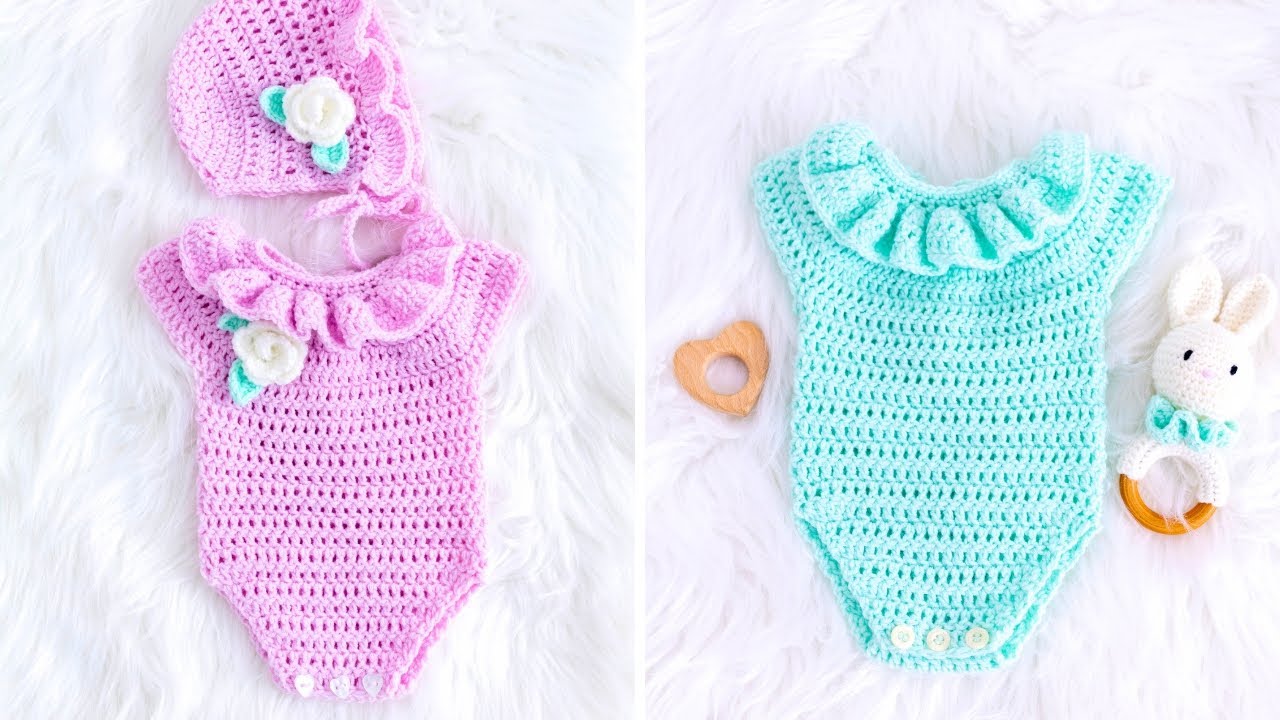
by If you’re looking for a cute and functional handmade gift or outfit for a little one, the crochet baby romper is a perfect project. Rompers are one-piece garments that offer both comfort and style for babies, and crocheting one allows you to personalize every stitch with love.
This guide will walk you through how to make a crochet baby romper step-by-step — from choosing materials to final assembly. It’s beginner-friendly but also offers tips for intermediate crocheters to elevate their design.

What You’ll Need
Yarn:
-
Type: Soft, baby-safe yarn (acrylic, cotton, or bamboo)
-
Weight: Light Worsted (Category 3) or DK (Double Knitting)
-
Amount: 250–350 yards for 0–6 month size
Tools:
-
Crochet hook: 4.0 mm (G/6) or per yarn label
-
Tapestry needle (for weaving in ends)
-
Stitch markers (optional)
-
Buttons or snaps (for closure, 2–4 pieces)
-
Scissors
-
Measuring tape
Sizing Chart
The instructions below are for 0–6 months. For other sizes, increase chains and rows accordingly.
| Age | Chest Circumference | Length (Shoulder to Crotch) |
|---|---|---|
| 0–6 months | 16–17 in (40–43 cm) | 13–14 in (33–36 cm) |
| 6–12 months | 18–19 in (45–48 cm) | 15–16 in (38–41 cm) |
| 1–2 years | 20–21 in (50–53 cm) | 17–18 in (43–46 cm) |
Basic Stitches Used
This pattern uses simple, common stitches:
-
ch – chain
-
sl st – slip stitch
-
sc – single crochet
-
hdc – half double crochet
-
dc – double crochet
-
inc – increase (2 stitches in one stitch)
-
dec – decrease (crochet two stitches together)
If you’re new to any of these, practice on a small swatch first.
Construction Overview
The romper is made top-down in one piece:
-
Start at the yoke (chest/shoulder area)
-
Work downward to form the body
-
Split the bottom into leg openings
-
Add straps and buttons
This method avoids seams and makes it easy to adjust as you go.
Step-by-Step: Easy Crochet Baby Romper (0–6 Months)
Step 1: Make the Yoke (Top Section)
-
Foundation Chain
-
Ch 60 (adjust in multiples of 4 for other sizes)
-
Join with a sl st to form a circle (ensure the chain isn’t twisted)
-
-
Rounds 1–4 (Establishing Ribbing)
-
Ch 2 (doesn’t count as dc), dc in each stitch around
-
Sl st to join
-
Repeat for 3 more rounds (total of 4 dc rounds)
-
-
Optional: Add Ribbing Texture
-
For extra texture, alternate fpdc (front post double crochet) and bpdc (back post double crochet) in Round 4
-
✂️ Step 2: Body of the Romper
Now we start working downward from the chest.
-
Rounds 5–15 (or until desired torso length)
-
Ch 2, dc in each stitch around
-
Increase slightly every 2–3 rows (e.g., add 4 extra stitches evenly spaced)
-
-
Optional:
-
Add stripes or stitch variations (shell stitch, V-stitch, or mesh)
-
Length tip: Stop when the piece measures about 9–10” from shoulder to crotch.
Step 3: Split for Leg Openings
Now you’ll divide the tube into two legs.
-
Divide Stitches in Half
-
Count stitches and split in two (e.g., 66 stitches = 33 per leg)
-
Attach a stitch marker to mark the front/back
-
-
First Leg
-
Join yarn at center crotch
-
Dc around half the stitches
-
Join with sl st
-
Work 3–5 more rounds for leg length
-
Optional: Add ribbing (fpdc/bpdc) or sc edging
-
-
Second Leg
-
Repeat on the other half
-
Step 4: Bottom Closure (Optional)
To make changing easier, many rompers have button or snap closures at the crotch.
-
After finishing both legs, use sc to create a band across the crotch front and back
-
Add 2–3 buttonholes on the front band and sew buttons to the back
-
Or sew in plastic snaps
Step 5: Add Straps
-
Mark Placement
-
Try folding the romper flat to find strap positions
-
Mark where you want the front of each strap to start (usually just beside each shoulder)
-
-
Make Each Strap
-
Join yarn and ch 20–25 (adjust for baby’s shoulder length)
-
Turn and sc back down the chain
-
Attach to the back panel (or make buttonholes to create adjustable straps)
-
-
Sew Buttons on the Back or use snaps to close the straps
Step 6: Finishing Touches
-
Edging: Use sc or decorative stitches around neck, arms, and legs for a clean finish
-
Weave in all yarn ends with a tapestry needle
-
Steam block (optional) to shape and soften
Design Variations
Once you’ve mastered the basic romper, here are some fun ways to customize:
Color Options:
-
Stripes
-
Ombre / Gradient yarn
-
Color-block top and bottom
Stitch Ideas:
-
Shell stitch skirt attached at the waist for a romper-dress hybrid
-
Puff stitches or bobbles for texture
-
Lacy stitches for summer versions
Embellishments:
-
Appliqués (hearts, stars, animals)
-
Crochet ruffles on the straps or bum area
-
Add pockets
Washing Instructions
Always check the yarn label, but general care for baby garments:
-
Machine wash on gentle
-
Cold or warm water
-
Mild detergent
-
Lay flat to dry or tumble dry on low (if yarn allows)
Final Thoughts
A crochet baby romper is the perfect mix of cozy and cute — practical for playtime or special occasions. It’s a project that allows you to improve your skills, play with color and texture, and create something truly memorable.
Whether you’re crocheting for your own little one or making a special gift, your time and love stitched into every row will surely be appreciated.
VIDEO TUTORIAL: